Category: Featured

  • Crochet Geometry

    Crochet Geometry

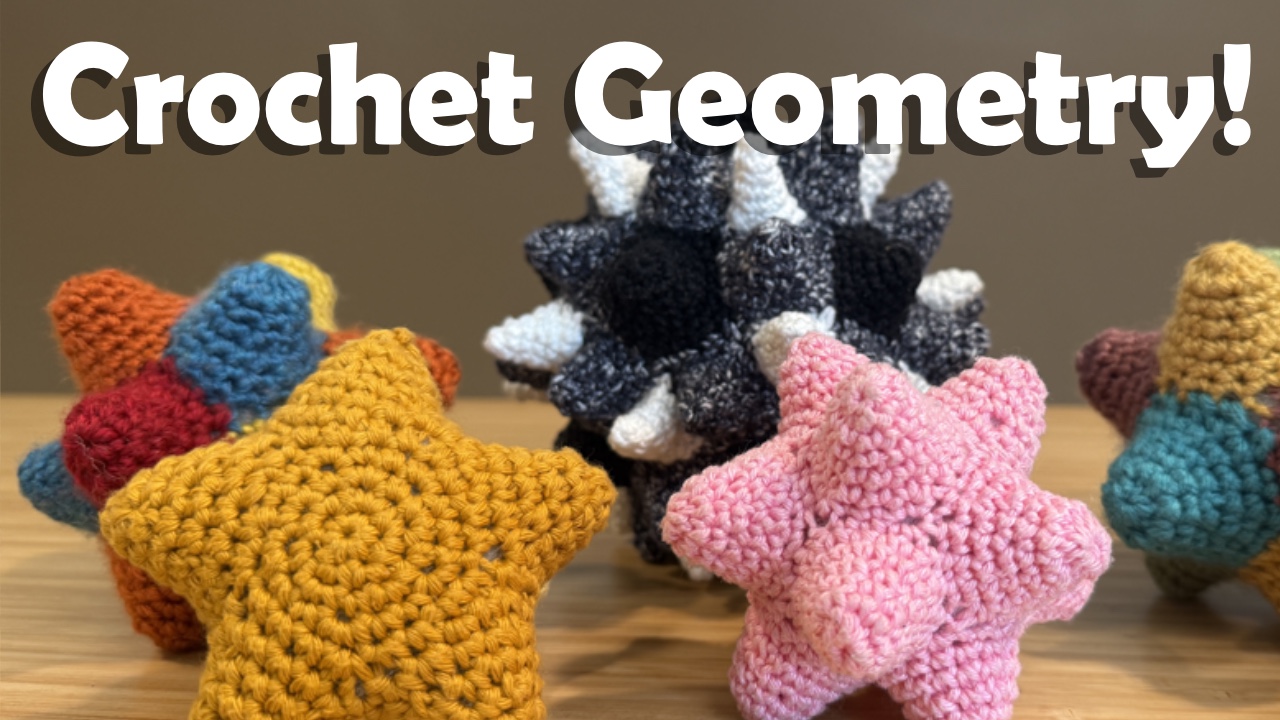
    Over the past few months, I’ve been messing around with a technique that allows me to crochet spiky versions of geometric shapes. I’ve found this really fun to work with, and wanted to share the technique so that others can also experiment with it!

    I’m not claiming to be the first person to make something like this- I found this Berocco pattern from this page on the MOMATH site after messing around with my own version for a bit. I just want to share my personal approach to this sort of thing in the chance others find it useful.

    The crochet stitches used to create this are all pretty basic, but the application of them could get tricky if you aren’t comfortable with freehanding your crochet projects or otherwise not working from a pattern. I do my best to spell out every step you need to take here, but this truly is meant to be a crochet technique tutorial and not a pattern. I’ll be explaining the process using an example in this tutorial, but that example only covers one possible application and approach!

    This is also a fairly mathematical technique! I’ve done my best to keep all the math as simple as possible for those of you who aren’t as into it as I am, but you will need some understanding of basic shapes and geometry terms here. I’ve split the math into two sections as well: the basic stuff you need to get started with this technique, and the more in depth math and other suggestions for those of you who want to really take this idea and run with it.

    There is also a video version of this technique available here on my YouTube channel, if you feel you learn better through video.

    If you’re sticking around with the post version of this tutorial, we’ll get started by talking about the stitches used for this technique!

    Part 1: The Stitches

    The stitches you need to know for this technique are single crochet (sc), foundation single crochet (fsc), and the invisible decrease (invdec). You can also do this technique using a traditional single crochet decrease, but seeing as we’re working in continuous rounds like we would with amigurumi, an invisible decrease is a little more useful here.

    You’re also going to want to know how to use a foundation single crochet to work from existing stitches, and technically how to do a standing single crochet as well. If you don’t know what that is, it’s essentially a single crochet into an existing project with a slip knot of new yarn on your hook.

    I’ve linked all the tutorials necessary below, in both right and left handed formats depending on your preference.

    Technique overview

    Before we get into the math, I want to do a quick overview of how this technique works so the next section makes a bit more sense. We’ll be creating a loop using fsc’s to make the perimeter of the faces of our shape. This serves as the first round of our spike, which we’ll work upwards towards the point. New spikes will be worked directly into the base of existing ones, and we’ll be using fsc’s to complete a ring going away and then back to this base, again tracing out the perimeter of the face.

    When you’re ready, join me on the next page to get into the math of this technique!

    Pages: 1 2 3 4


  • Layered Rounds – Left Handed

    Layered Rounds – Left Handed

    In this post, we’ll cover how to layer rounds in a crochet project to add a bit of depth to a project. This technique allows a layer to be added to a crochet item without modifying the underlying pattern!

    If you’re right handed, you can find that tutorial here, or if you prefer a video tutorial, you can check that out here.

    The setup

    First, make the piece to be overlapped. Make sure you work up through the round to be overlapped. In this example, I want round 9 to be overlapped, so I make what I’ll call my “existing piece” through round 9.

    You can cut the yarn for this piece. Don’t sew the end in though- leave it free. It’ll make it easier to work through the stitches in this piece later on.

    Making the Overlapping Ring

    First, we need to make the overlapping layer. This round will have the same stitch count as the round we’re looking to overlap. In this example, we’re overlapping a round of 24 stitches, so we need this overlapping layer to be 24 stitches as well.

    Make a chain the same length as the number of stitches in the round to be overlapped (chain 24, in this example).

    Now, making sure the chain isn’t twisted, slip stitch into the back bump of the first chain, closing the chain into a loop.

    Chain 1, and single crochet into the same bump you slip stitched into.

    Now crochet around the chain loop, placing a single crochet in the back bumps of each chain.

    For this example, you’ll end up with 24 total stitches in your round.

    If you’re struggling to crochet in the back bumps of your chain, or otherwise don’t want to do that, you can always crochet into the top of your chain. I just prefer the look of working into the back bumps.

    Connecting the Pieces

    In this round, we’ll be connecting both pieces together by crocheting through both of them at once.

    Start by finding the first stitch of your ring. Insert your hook into this stitch.

    Maneuver the outer layer so that your hook is going through the middle of the ring. This makes it easier to go through the existing piece.

    Now, find the first stitch of your existing piece. Insert your hook into this stitch as well.

    Move your hook back through the middle of the outer ring. Your hook is now going through both the ring and the existing piece, with the yarn also going towards the middle of the ring. It should look like the image below. This ensures that nothing gets wrapped up incorrectly.

    Now, complete a single crochet through both of these rounds at once to connect them.

    The connecting layer

    The connecting layer that we’ve started will follow the next round in whatever pattern you’re working from. For example, in this post, the overlapping layer is round 9, so our connecting round is round 10. I’d follow the instructions for round 10 of the pattern I’m working from when connecting the two pieces together.

    If your connecting round is worked by just single crocheting around the piece, this step is really simple. Continue single crocheting through both layers at once, first inserting your hook through the outer layer, then through the existing piece.

    If your connecting layer

    Increasing in the connecting round

    If your connecting round has increases, simply do a single crochet through the same stitches as you just worked to increase. Make sure you still go through both the outer layer and the existing piece!

    Decreasing in the connecting round

    If your connecting round has decreases, what I suggest is to invisible decrease in both the outer layer and existing piece.

    To do this, first set up an invisible decrease for the outer layer (tutorial here) by putting your hook through the front loops of the next two stitches. Don’t actually stitch into this- just keep the loops on your hook!

    Now, set up an invisible decrease on the existing piece. This can be a little tricky.

    Your hook should be going through the front loops of 4 stitches at this point- first on the outer layer, then on the existing piece. Now, complete a single crochet through these loops.

    Continuing the pattern

    You can now continue your pattern as normal! In this example, my overlapping round was round 9, my connecting round was round 10, so I’ll pick my pattern back up starting from round 11.

    The fact that we’re able to follow the pattern exactly as written except for the addition of this outer round is something I think is really neat and useful for adding a little bit more detail and texture to patterns you might come across.


  • Layered Rounds – Right Handed

    Layered Rounds – Right Handed

    In this post, we’ll cover how to layer rounds in a crochet project to add a bit of depth to a project. This technique allows a layer to be added to a crochet item without modifying the underlying pattern!

    If you’re left handed, you can find that tutorial here, or if you prefer a video tutorial, you can check that out here.

    The setup

    First, make the piece to be overlapped. Make sure you work up through the round to be overlapped. In this example, I want round 9 to be overlapped, so I make what I’ll call my “existing piece” through round 9.

    You can cut the yarn for this piece. Don’t sew the end in though- leave it free. It’ll make it easier to work through the stitches in this piece later on.

    Making the Overlapping Ring

    First, we need to make the overlapping layer. This round will have the same stitch count as the round we’re looking to overlap. In this example, we’re overlapping a round of 24 stitches, so we need this overlapping layer to be 24 stitches as well.

    Make a chain the same length as the number of stitches in the round to be overlapped (chain 24, in this example).

    Now, making sure the chain isn’t twisted, slip stitch into the back bump of the first chain, closing the chain into a loop.

    Chain 1, and single crochet into the same bump you slip stitched into.

    Now crochet around the chain loop, placing a single crochet in the back bumps of each chain.

    For this example, you’ll end up with 24 total stitches in your round.

    If you’re struggling to crochet in the back bumps of your chain, or otherwise don’t want to do that, you can always crochet into the top of your chain. I just prefer the look of working into the back bumps.

    Connecting the Pieces

    In this round, we’ll be connecting both pieces together by crocheting through both of them at once.

    Start by finding the first stitch of your ring. Insert your hook into this stitch.

    Maneuver the outer layer so that your hook is going through the middle of the ring. This makes it easier to go through the existing piece.

    Now, find the first stitch of your existing piece. Insert your hook into this stitch as well.

    Move your hook back through the middle of the outer ring. Your hook is now going through both the ring and the existing piece, with the yarn also going towards the middle of the ring. It should look like the image below. This ensures that nothing gets wrapped up incorrectly.

    Now, complete a single crochet through both of these rounds at once to connect them.

    The connecting layer

    The connecting layer that we’ve started will follow the next round in whatever pattern you’re working from. For example, in this post, the overlapping layer is round 9, so our connecting round is round 10. I’d follow the instructions for round 10 of the pattern I’m working from when connecting the two pieces together.

    If your connecting round is worked by just single crocheting around the piece, this step is really simple. Continue single crocheting through both layers at once, first inserting your hook through the outer layer, then through the existing piece.

    If your connecting layer

    Increasing in the connecting round

    If your connecting round has increases, simply do a single crochet through the same stitches as you just worked to increase. Make sure you still go through both the outer layer and the existing piece!

    Decreasing in the connecting round

    If your connecting round has decreases, what I suggest is to invisible decrease in both the outer layer and existing piece.

    To do this, first set up an invisible decrease for the outer layer (tutorial here) by putting your hook through the front loops of the next two stitches. Don’t actually stitch into this- just keep the loops on your hook!

    Now, set up an invisible decrease on the existing piece. This can be a little tricky.

    Your hook should be going through the front loops of 4 stitches at this point- first on the outer layer, then on the existing piece. Now, complete a single crochet through these loops.

    Continuing the pattern

    You can now continue your pattern as normal! In this example, my overlapping round was round 9, my connecting round was round 10, so I’ll pick my pattern back up starting from round 11.

    The fact that we’re able to follow the pattern exactly as written except for the addition of this outer round is something I think is really neat and useful for adding a little bit more detail and texture to patterns you might come across.


  • Welcome to Crochetsics Basics!

    Welcome to Crochetsics Basics!

    Welcome to Crochetsics Basics! This is my tutorial series for people who are absolute beginners at crochet (and fiber arts in general) and want to learn from scratch. This course should teach you everything you need to follow a beginner pattern and hit the ground running, as well as a few other techniques and stitches you may come across.

    Course structure

    I’ve split this course into two “halves”: in the first half we’ll be learning the basic crochet stitches and how to work in rows. In the second, we’ll learn some more advanced stitch techniques and how to work in rounds. Each half will be capped off with a cinch sack project that uses all the techniques we’ve covered so far.

    The course also has right and left handed versions. Most people hold their hook in their dominant hand, and their yarn in their non-dominant hand, so that’s how I’ve named each version of the course. Feel free to follow whichever version feels more comfortable for you! I’m right handed, and so the left-handed version just features me mirroring anything I did for the right-handed version. If there are any mistakes in my descriptions, let me know and I’ll fix them!

    There’s also a corresponding video tutorial series, so if you’d rather follow video tutorials, those will be linked at the start of each post. Here’s the video for this post!

    First, let’s get into the things you’ll need to follow along with this course.

    Hook

    The hook I’d suggest for this course is a 5.5 mm inline aluminum hook.

    This may also be labeled as a US I or I9 hook.

    You don’t need to worry too much about why I suggest this type of hook in particular, but if you’re curious, keep reading. If not, go ahead and skip down to the yarn section.

    Shape

    You’re going to see two different hook shapes: tapered and inline.

    I’d suggest an inline hook if you’re just starting out. These are the ones that look like a cylinder with a notch carved into them. You’re probably less likely to drop your yarn with these, and the sharp point can make it easier to get the hook into a stitch.

    Tapered hooks are great once you’re more comfortable with crochet. They don’t have any sharp edges, making it much easier to slip through loops on your hook. You can crochet quicker with these, but they may also result in tighter stitches. It’s also a bit easier to drop loops since there’s nothing “grabby” on the hook.

    Material

    Aluminum is I feel the slipperiest material you can get, which can make it easier to slide your hook through the yarn. I’ve found wooden hooks to be super grippy, so I’ve had to hold my yarn pretty loose to use them.

    Handle

    Some crochet hooks also have ergonomic grips. These are great to give yourself a little bit larger handle to hold on to, but they aren’t critical for the size hook we’ll be dealing with so no worries if you can’t find one.

    Yarn

    For this course, try to get a 4, or worsted, weight yarn.

    In America, this is shown in the little yarn emblem above. These are also known as medium or worsted weight yarns. The yarn label also has information on the amount of yarn in the skein and the fiber content. They often also have suggested hook or needle sizes.

    The material you choose for this isn’t super critical for this course, so it’s really dependent on what you like. The fiber type and makeup will also be listed somewhere on the label

    Here’s some common yarn fibers to start out with:

    Acrylic- Usually one of the cheaper options, and fairly stretchy. Some people don’t like this for sensory reasons, since it can be kinda scratchy.

    Cotton- Stiffer than acrylic and much less stretch. This can make it a bit tougher on your hands, but may be more comfortable to use from a sensory standpoint.

    Wool- Most common in specialty or independent yarn stores, but also available in big craft stores. These can also be fairly scratchy depending on the yarn you get. Merino wool is typically a bit softer.

    When you select your yarn, feel them to see whether or not you like them. It’ll probably take some time to figure out what you like. Unlike for the hook, I’d suggest a yarn that ISN’T super slippery. These can be harder to hold on to with your hook, so try to avoid slick feeling yarns like bamboo or certain acrylics.

    If you’re getting your yarn secondhand, it might not be labeled. In that case, you can determine the yarn size using the wraps per inch (wpi) of the yarn- the number of wraps it takes for the yarn to span an inch. Worsted weight yarn is about 9 wpi.

    Notions

    These are the non-hook-or-yarn things you should have on hand:

    Tapestry needle- These are needles specifically for yarn, so they’re bigger than sewing or embroidery needles. I personally really like the ones with bent ends, but the straight ones are fine too. I’d advise against plastic needles since they’re more susceptible to bending or breaking.

    Stitch marker- These are always useful and are used to mark stitches (who would have guessed?) You need to get ones that open and close. The fully enclosed ones are for knitting and don’t work for crochet.

    Scissors- For cutting your yarn!

    Conclusion

    Alright! Time for a summary of what you’ll need for this course:

    • 5.5 mm aluminum inline hook
    • 4/worsted weight yarn
    • Tapestry needle
    • Stitch marker
    • Scissors

    We’ll be starting to learn to crochet in the next post, so get your hands on these, and I’ll meet you there!

    Chains – Right Handed

    Chains – Left Handed